Your First Project
This tutorial walks you through everything from opening Khaos Machine for the first time to reading AI analysis of your screenplay. No technical experience needed — just your screenplay file.
Time: About 10 minutes.
What You'll Do
- Open Khaos Machine
- Set up an AI engine (free options available)
- Import your screenplay
- Run analysis
- Explore what the AI found
By the end, you'll have a rich breakdown of your scenes, characters, and locations — dramatic beats, character arcs, relationship maps, and more.
Step 1: Open Khaos Machine
After installing, look for the Khaos Machine icon in your menu bar (the K at the top of your screen on Mac).
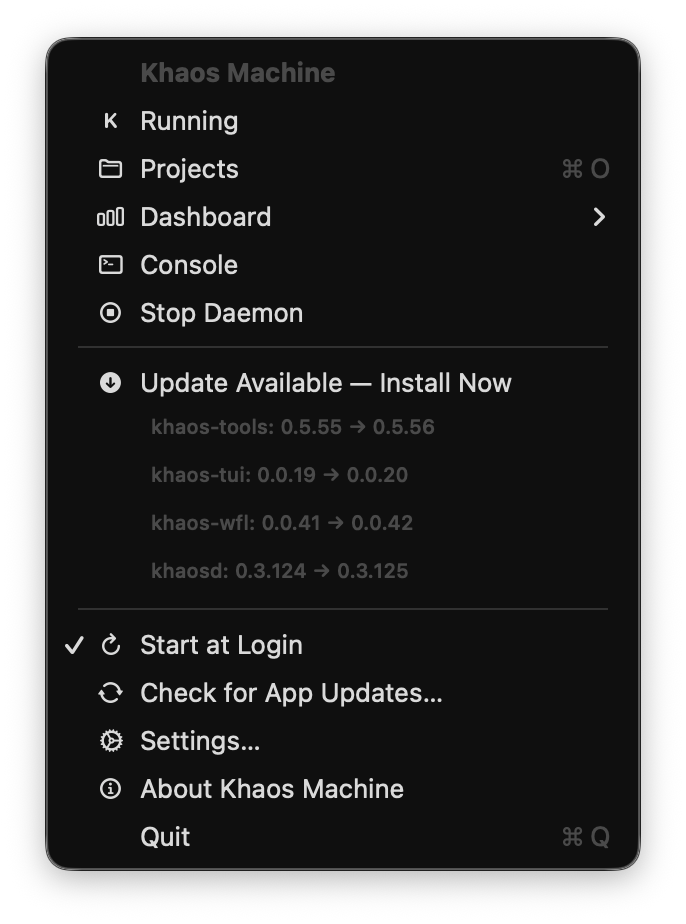
Click it and select Projects. Your browser will open with the Projects page — this is your home base.
If you see an empty page, that's normal. You haven't created any projects yet — we'll do that in a moment. First, let's make sure Khaos Machine can talk to an AI.
Step 2: Choose Your AI Engine
Khaos Machine needs an AI engine to analyze your screenplay. There are two approaches:
- Local AI (free) — runs on your own computer. Your screenplay never leaves your machine. No accounts, no fees, works offline.
- Cloud AI (pay-per-use) — sends your screenplay to a service like OpenAI or Anthropic for analysis. Higher quality results, but requires an account and costs a small amount per use.
We recommend starting with local AI. It's free, private, and gives you a feel for how Khaos Machine works before deciding whether cloud analysis is worth it for your workflow.
Local AI Setup
You'll install a small app that runs AI models on your computer. There are two options — pick whichever feels more comfortable:
| Ollama | LM Studio | |
|---|---|---|
| Best for | Quick setup, runs in the background | Visual interface, easy model browsing |
| Install | Download from website, one Terminal command | Download from website, everything in the app |
| Feels like | A background service (set it and forget it) | An app you can open and manage |
Both are free, both work great with Khaos Machine, and you can always switch later.
Option 1: Ollama (Quickest Setup)
-
Download Ollama from ollama.com and install it — just like any other app. It runs quietly in the background.
-
You'll need to download an AI model. Open Terminal (on Mac, press ⌘ Space, type "Terminal", and hit Enter) and paste this line:
ollama pull qwen3:8b
This downloads a model called Qwen 3 (about 5 GB). It only needs to happen once — after that, it's always available on your machine.
- That's it for Ollama setup. You can close Terminal.
Option 2: LM Studio (Visual Interface)
If you'd rather not use Terminal at all, LM Studio gives you a visual app for managing AI models.
-
Download LM Studio from lmstudio.ai and install it.
-
Open LM Studio and use its search bar to find a model. We recommend searching for qwen3 8b — click the download button next to it.
-
Once downloaded, click the Local Server tab in LM Studio (the icon looks like ↔) and click Start Server. This lets Khaos Machine talk to the model.
Unlike Ollama (which runs in the background automatically), LM Studio needs to stay open with its server running while you use Khaos Machine. You can minimize the window — just don't quit the app.
Connect Khaos Machine to Your Local AI
Now that you have a local AI model ready, point Khaos Machine to it:
- Click Settings from the Khaos Machine menu bar.
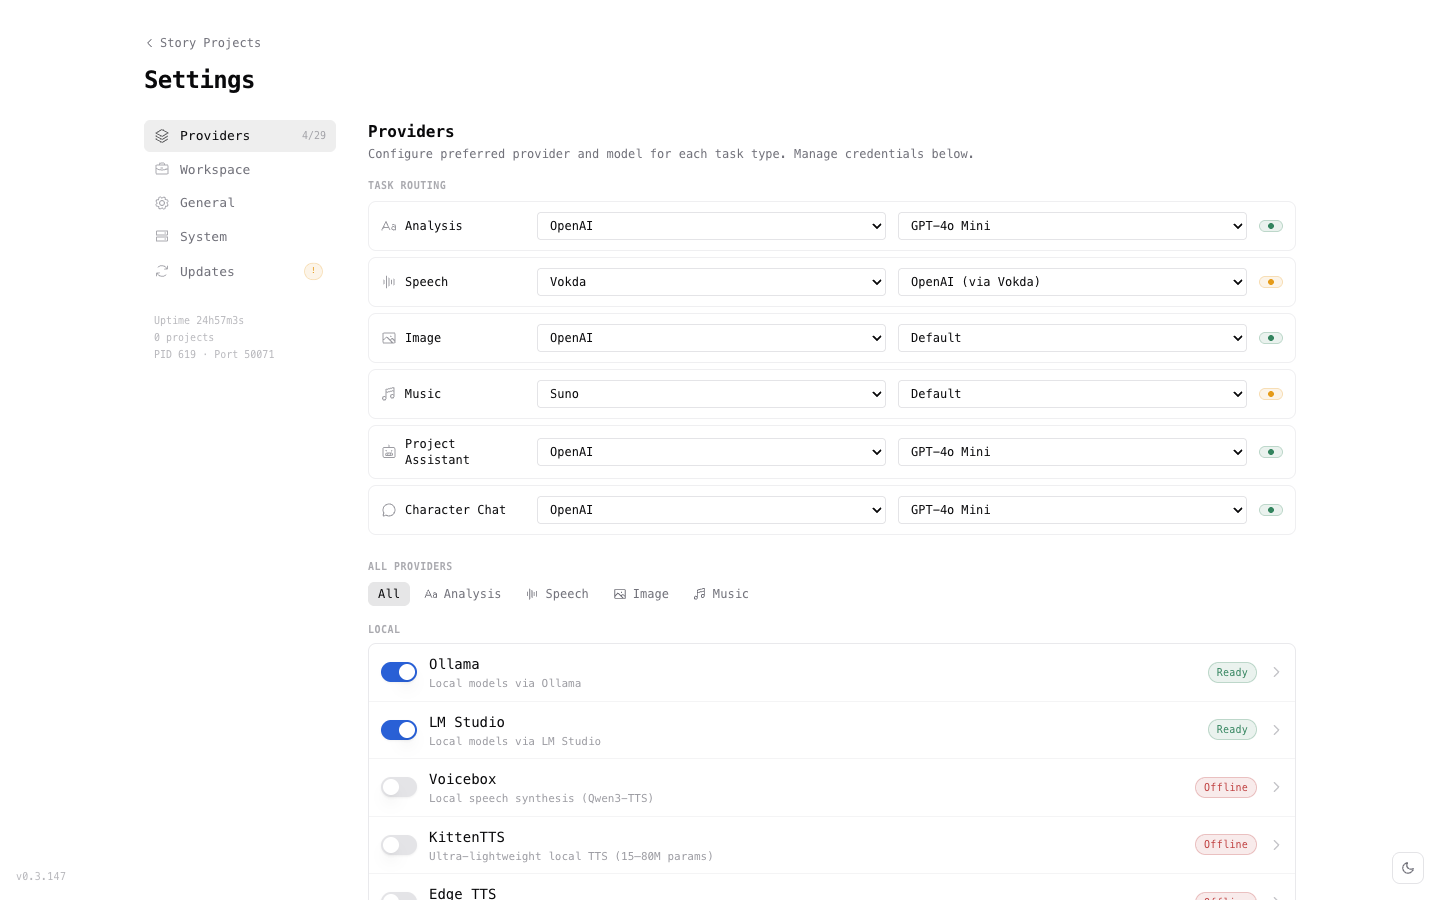
- Scroll down to the provider list. You should see Ollama or LM Studio (whichever you installed) with a green Ready badge.
-
If it shows "Offline", make sure the app is running — Ollama starts automatically on most systems, while LM Studio needs its server started manually.
-
In the Task Routing section at the top of Settings, set the Analysis row to use your local provider and the model you downloaded.
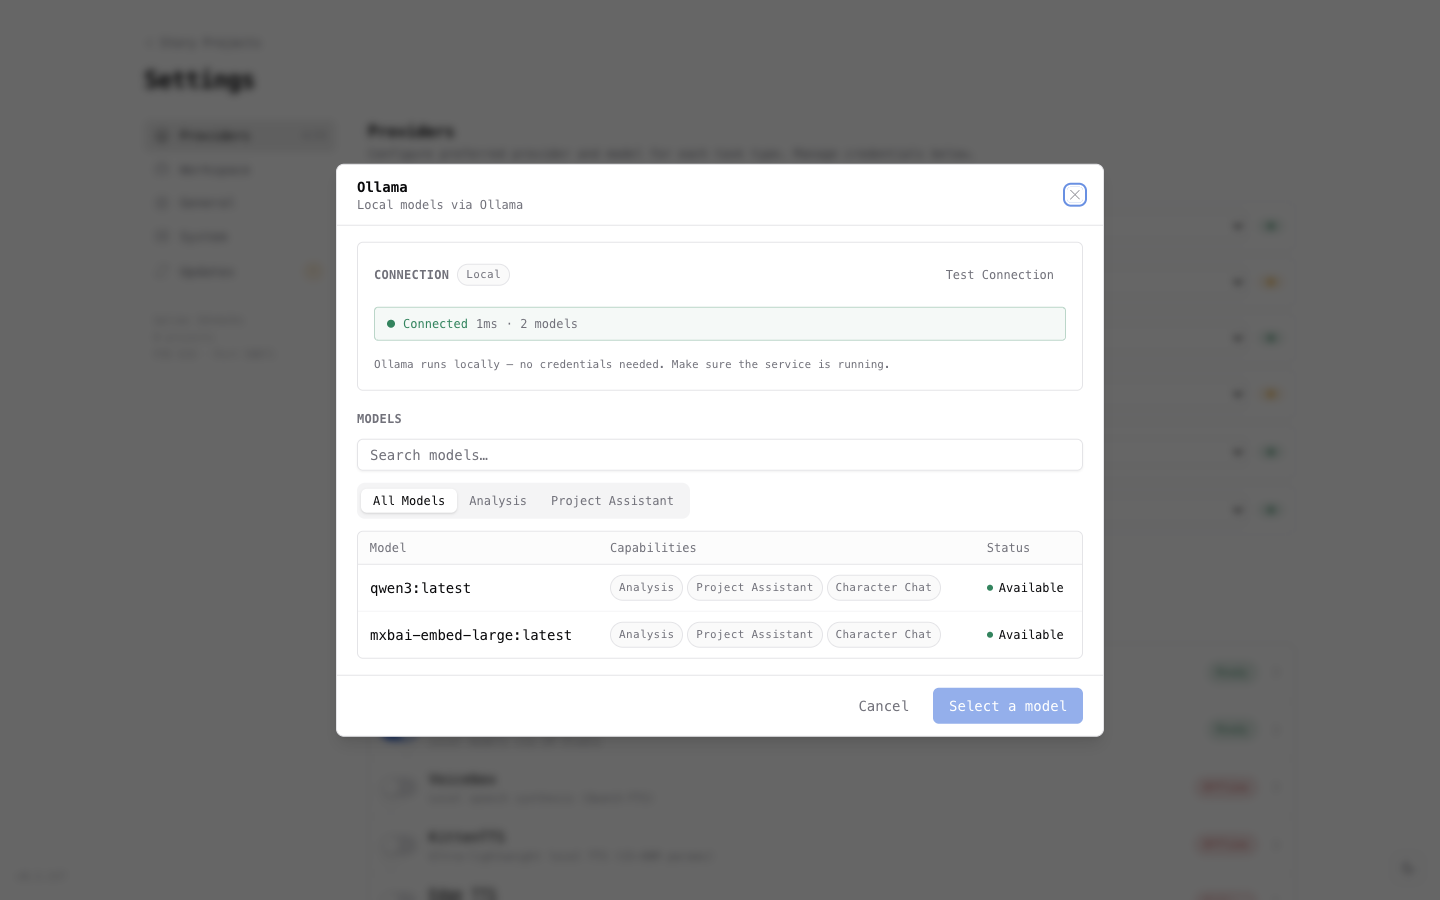
Click the provider name in the list to open its detail panel, then click Test Connection. You should see a green "Connected" message with your model listed.
Choosing a Model
If you're not sure which model to download, here's a quick guide:
| Model | Download Size | RAM Needed | Quality | Best For |
|---|---|---|---|---|
| Qwen 3 8B | ~5 GB | 8 GB | Good | Most computers, fast results |
| Llama 3 8B | ~5 GB | 8 GB | Good | Alternative to Qwen, similar quality |
| Mistral 7B | ~4 GB | 8 GB | Good | Slightly smaller, a bit faster |
| Llama 3 70B | ~40 GB | 48 GB+ | Excellent | High-end machines, best local quality |
Start with Qwen 3 8B — it gives good analysis quality and runs well on most modern computers (anything with 8 GB of RAM or more, which includes most machines from the last few years).
To download these in Ollama, use the Terminal commands:
ollama pull qwen3:8b
ollama pull llama3:8b
ollama pull mistral:7b
In LM Studio, search for the model name and click download — no Terminal needed.
If analysis is very slow or Khaos Machine reports errors, your computer may not have enough memory for the model. Try a smaller model like Mistral 7B, or consider using a cloud provider instead.
Alternative: Cloud AI (Pay-Per-Use)
If you'd prefer to use a cloud AI service, or if your computer struggles with local models:
- Sign up for an account with your preferred provider:
- Create an API key on their website (it's usually under "Settings" or "API Keys").
- In Khaos Machine Settings, click the provider name in the list.
- Paste your API key and click Test Connection.
- Set the Analysis task routing to your chosen provider.
With cloud providers, your screenplay text is sent to their servers for processing. If you're working on sensitive material, local AI keeps everything on your machine. See each provider's privacy policy for details.
For a detailed walkthrough of each cloud provider, see AI Providers.
Step 3: Import Your Screenplay
Now for the fun part — bring in your screenplay.
- Click the Khaos Machine menu bar icon and select Projects.
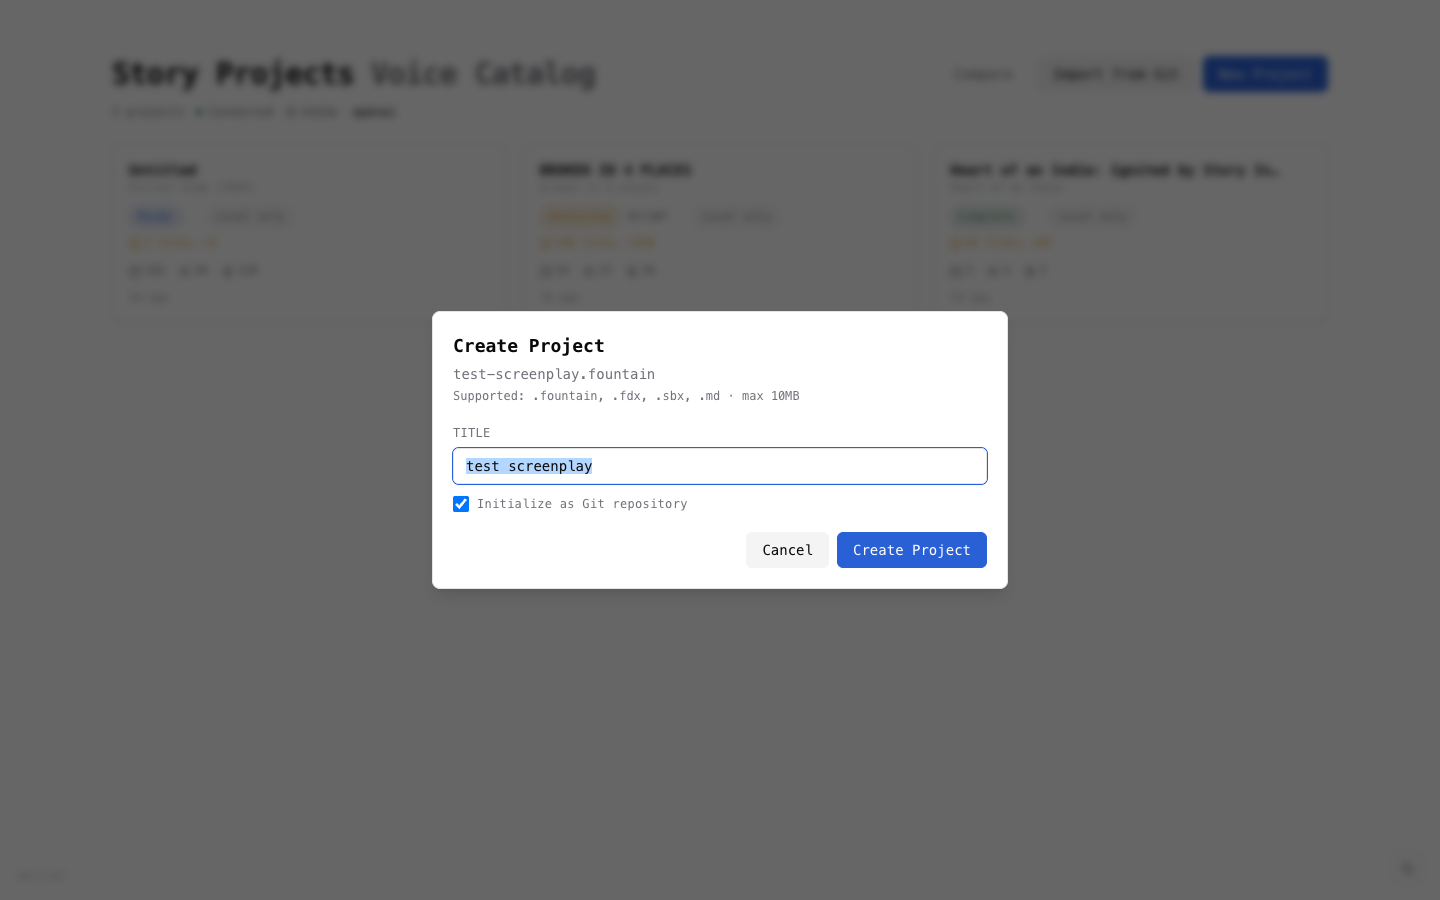
- Click the blue New Project button in the top-right corner.
- Your computer's file browser will open — navigate to your screenplay file and select it.
Khaos Machine can read screenplays in several formats:
| If you use... | Save/export as... |
|---|---|
| Final Draft | .fdx (File → Export) |
| Highland, Slugline, Fade In | .fountain (usually the native format) |
| WriterSolo, Arc Studio | .fountain (export option) |
| Any screenwriting app | .pdf (print to PDF — works as a fallback) |
| Plain text files | .txt or .fountain |
- Give your project a title (it auto-fills from the filename, but you can change it to your screenplay's actual title).
- Click Create Project.
Khaos Machine reads your screenplay and automatically finds every scene, character, and location. This takes just a few seconds, even for a full-length feature.
Step 4: Run Your First Analysis
After import, you'll land on the Dashboard — the main workspace for your project.
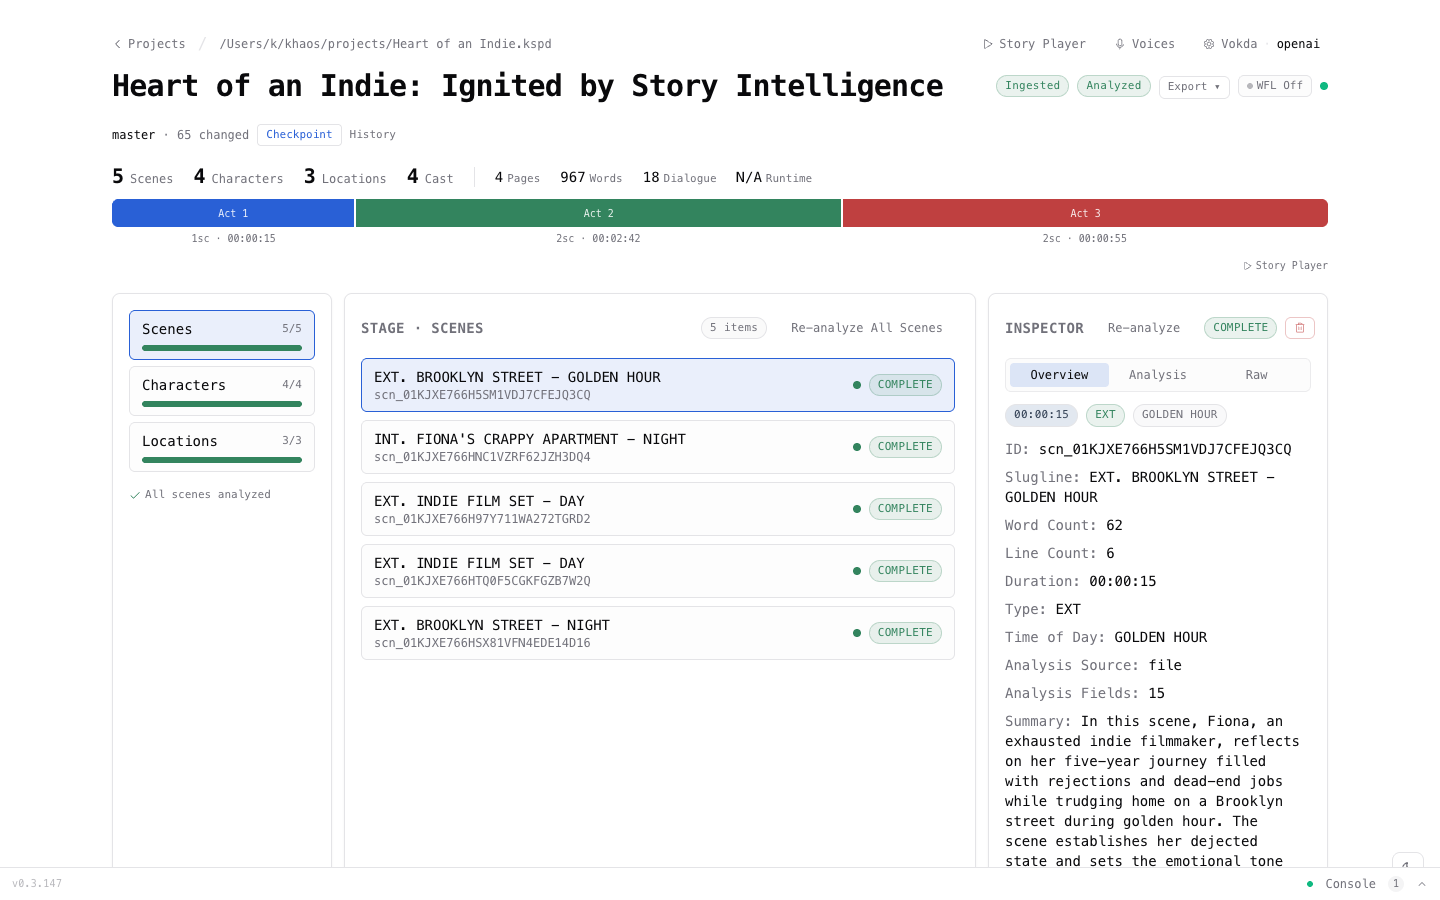
You'll see:
- Your act structure at the top (color-coded bars)
- Scenes, Characters, and Locations counts on the left
- A list of all your scenes in the center
To analyze your screenplay:
- Click Re-analyze All Scenes (or just "Analyze All Scenes" if it's a new project).
- Watch as each scene turns green with a COMPLETE badge.
- Click any scene in the list to see the analysis appear in the Inspector panel on the right.
With a local model like Ollama, each scene takes 10–30 seconds. A 5-scene short takes about a minute; a full feature (40–60 scenes) takes 15–30 minutes. Cloud providers like GPT-4o are typically faster.
You don't need to wait for everything to finish — results appear as each scene completes, so you can start reading immediately.
Step 5: Explore Your Results
This is where it gets interesting. Click on any scene to see what the AI found.
Scene Analysis
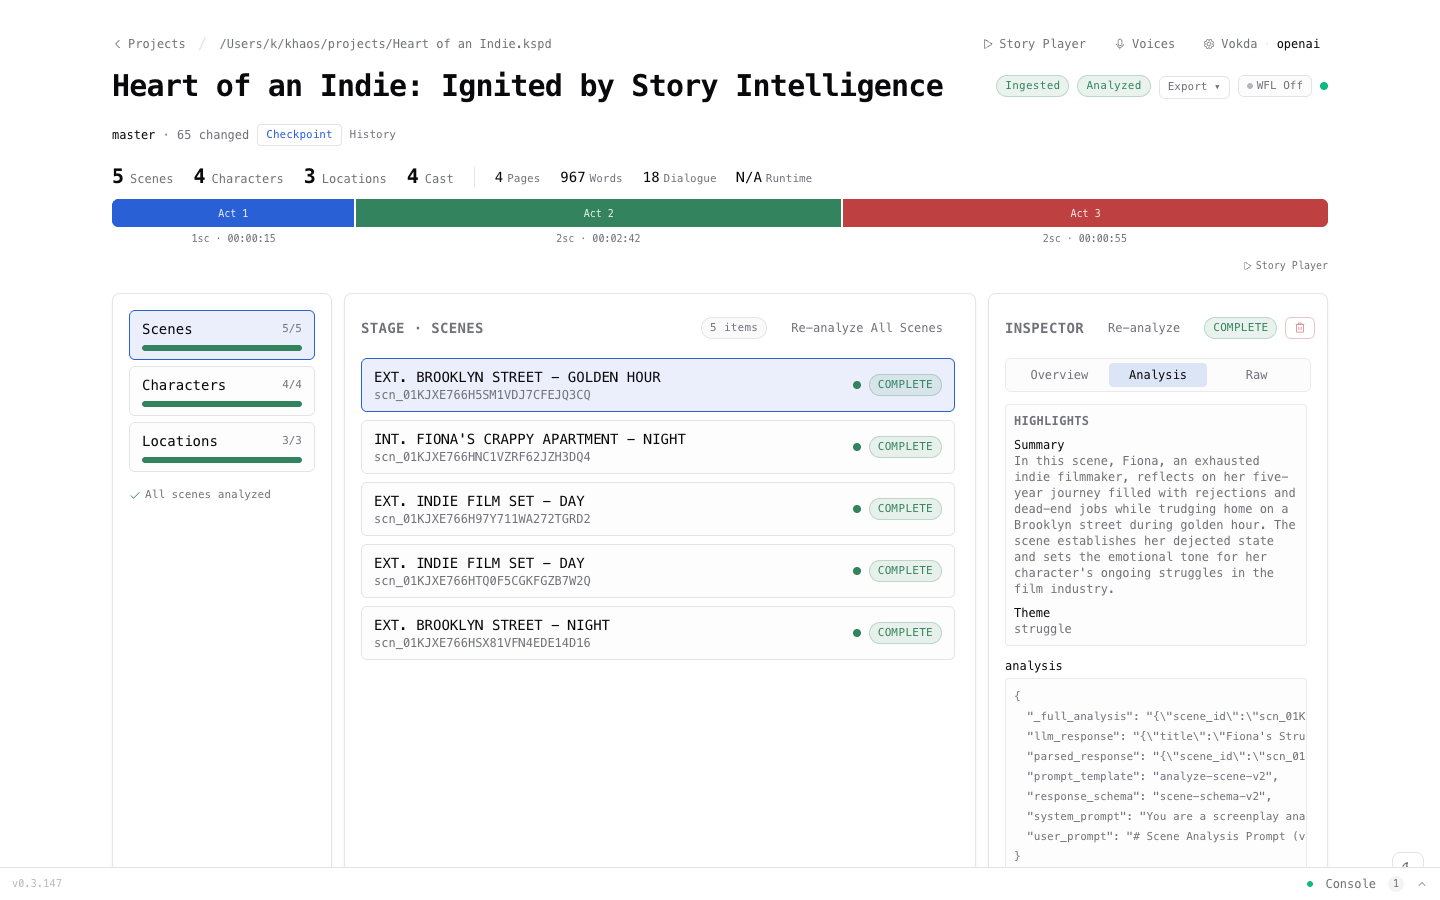
Click the Analysis tab in the inspector to see the full breakdown:
- Summary — a concise description of what happens in the scene
- Dramatic beats — exposition, conflict, revelation, turning points
- Mood and pacing — the emotional tone and rhythm
- Themes — narrative themes present in the scene
- Emotional arc — how the feeling shifts from start to finish
Character Profiles
Once scenes are analyzed, click Characters on the left to see character-level analysis. For a deeper dive, open the Character Builder from the top navigation bar.
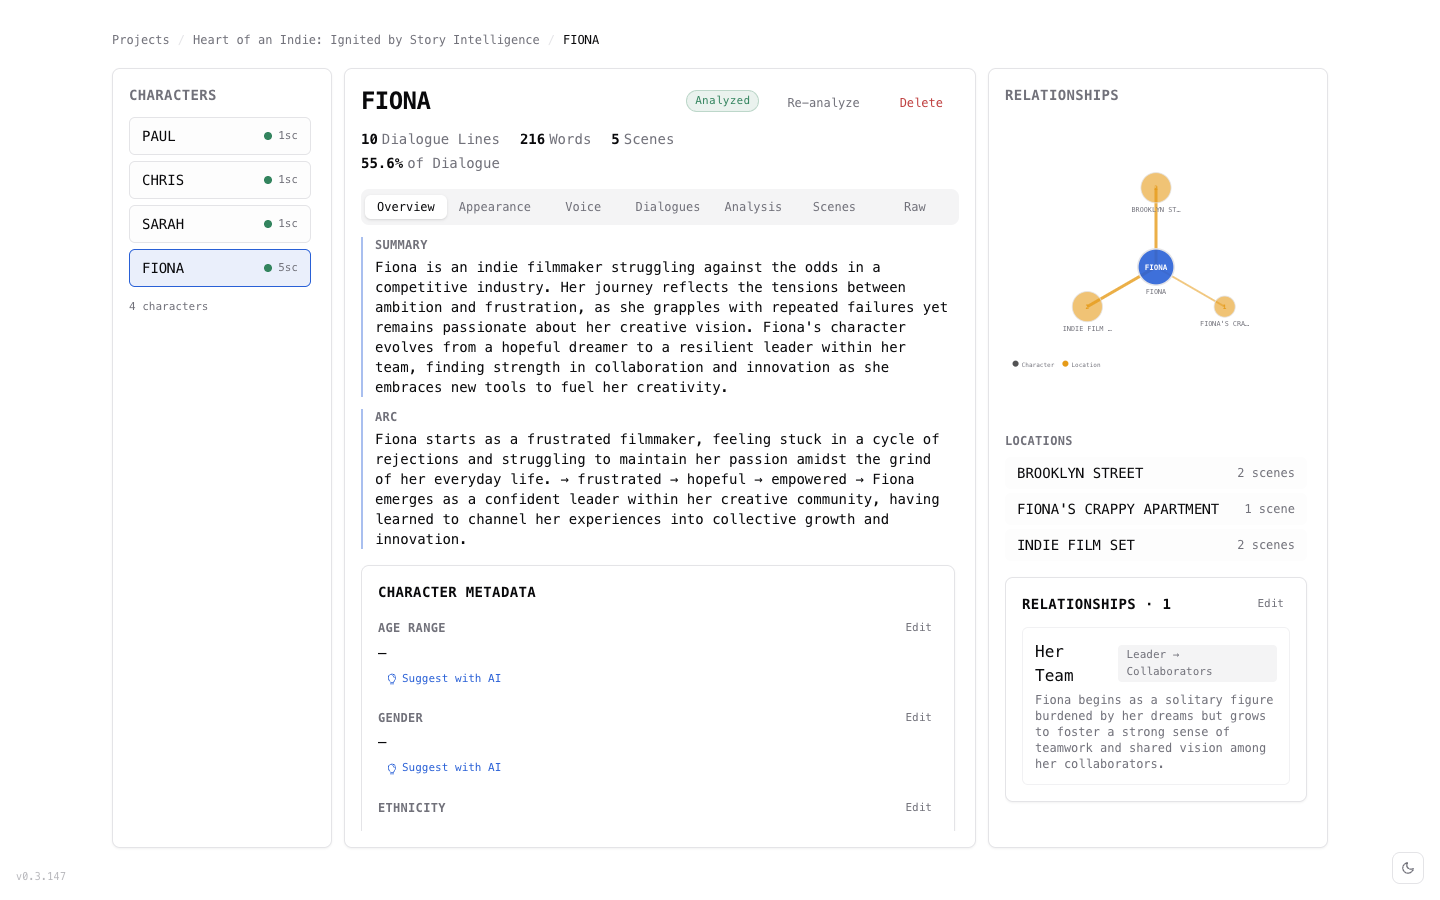
Each character profile includes:
- Summary — who they are and their role in the story
- Character arc — how they change (e.g., "frustrated → hopeful → empowered")
- Relationships — an interactive graph showing how characters connect
- Dialogue — every line they speak, organized by scene
Location Analysis
Click Locations on the left to see how each setting functions in your story — its atmosphere, symbolism, and which characters appear there.
Step 6: What to Do With Your Analysis
The analysis is a thinking tool, not a report card. Here are some ways screenwriters use it:
Spot structural issues early
- Is Act 2 running long? The act structure bar makes it visual.
- Does a character disappear for half the script? Check their scene count.
Deepen your characters
- Read the AI's character arc description. Does it match your intention?
- Check the relationship graph. Are important dynamics actually showing up in the dialogue?
Refine your scenes
- If the AI says a scene's mood is "melancholy" but you intended "bittersweet tension" — that's a signal to revise.
- Look at dramatic beats. If a big scene has no "conflict" beat detected, maybe the tension is too subtle.
Compare perspectives
- Run analysis with Ollama, then switch to GPT-4o in Settings and run it again.
- Both sets of results are kept — you can compare how different AI models read your story.
AI analysis is one perspective on your screenplay. Think of it like a well-read friend giving you notes — useful input, but you're the author. Ignore anything that doesn't ring true for your story.
Next Steps
You've imported a screenplay and run your first analysis. Here's what to explore next:
Cast Voices
Browse 622 voices from 25+ providers, audition them for your characters, and hear your screenplay read aloud.
Try Another AI
Run analysis with a different AI engine and compare results. Each provider brings a different perspective.
Deep Dive
Learn about batch analysis, incremental re-analysis, and working with signals for systematic revision.